Are you wondering how you can program your KNX smart home by yourself?
Regardless if you are a smart home enthusiast who wants to take control of his KNX smart home or an installer who wants to get proficient in KNX, you will need to know a thing or two about KNX programming.
In this guide we will showcase the basics of KNX programming and what are the important building blocks to work with. We will also teach you how to best prepare your ETS project file to integrate well with KNX visualisation servers and smart assistant platforms such as Apple HomeKit, Amazon Alexa, Google Home and others.
A quick spoiler: KNX programming is actually way simpler than it sounds 😉
1. Preparing the connection to your KNX installation
Before doing any kind of programming you first need to be able to actually connect to your KNX system.
You have two main options when it comes to connecting.
The most basic way is to use a KNX USB interface which enables you to connect your computer to KNX bus over USB port. Even though this option works well, you need to be physically connected to the USB interface at all times which is often limiting.
If you want to connect to your KNX system using your local network you can use a KNX IP interface which lets you access your KNX bus without needing to be physically connected to it. This comes in handy if you need for example to reprogram wall buttons and lights in a room that’s far away from your electrical cabinet, as you can simply take your laptop, go to the room and reprogram it from there.
The IP Interface also has other great benefits.
With some interfaces you can securely connect to your home remotely to reprogram it from afar without even needing to set eg. a VPNor they come with additional software to let you integrate other 3rd party smart home technologies directly with KNX technology.
If you still need to buy an IP interface, our 1Home Bridge IP interface packs all the needed features such as secure remote access (read more about how we handle security here) while you also get many IoT and voice control integrations with Apple HomeKit, Google Home and Amazon Alexa smart home ecosystems, all included in the package. Learn more about our 1Home Bridge IP interface.
2. Software and license
After you’ve connected to your KNX bus, you need software to program your smart home.
ETS (Engineering Tool Software) is the staple of KNX programming. The latest version, ETS6, was released in 2021 as an upgrade to ETS5. It comes with a modern, more intuitive interface, flexible cloud-based licensing, and better project management tools. New additions like Segment Couplers and KNX RF Multi devices help make installations more adaptable and efficient.

Take a look at the below comparison of ETS5 and ETS6, showing key upgrades that enhance usability, flexibility, and efficiency in smart home automation.
These changes make ETS6 more efficient for programming, easier to navigate, and better suited for modern smart home and building automation projects.
To use this Windows-based software, you'll need a license that matches the size and complexity of your project:
- ETS6 Lite (200 € + VAT): meant for small projects such as a small apartment since it supports a maximum of 20 devices. Note that if you have one switching actuator with 20 channels, this counts as one device even though you can use it to control 20 separate light groups.
- ETS6 Home (350 € + VAT): with support of up to 64 devices and one single project this is a great option for any smart home enthusiast that wants to take control over his home.
- ETS6 Professional (1000 € + VAT): without device and number of project limitations, this is the ultimate license with which you can configure KNX installations of all sizes.
Note: You can also use ETS without a license for up to 5 devices to familiarize yourself with the software.
ETS Inside was a user-friendly KNX programming tool for homeowners, enabling smart home control via mobile devices. While it improved in stability, it lacked the advanced features of ETS Home and ETS Professional and was eventually discontinued.
If you're not sure which ETS license is best for your needs, check out our guide to find the right option.
3: Programming your home
When you are equipped with your KNX interface, an ETS software and a license, you are ready to start with the programming. For this example we will work with the ETS5 software version.
There are 6 main programming concepts to understand:
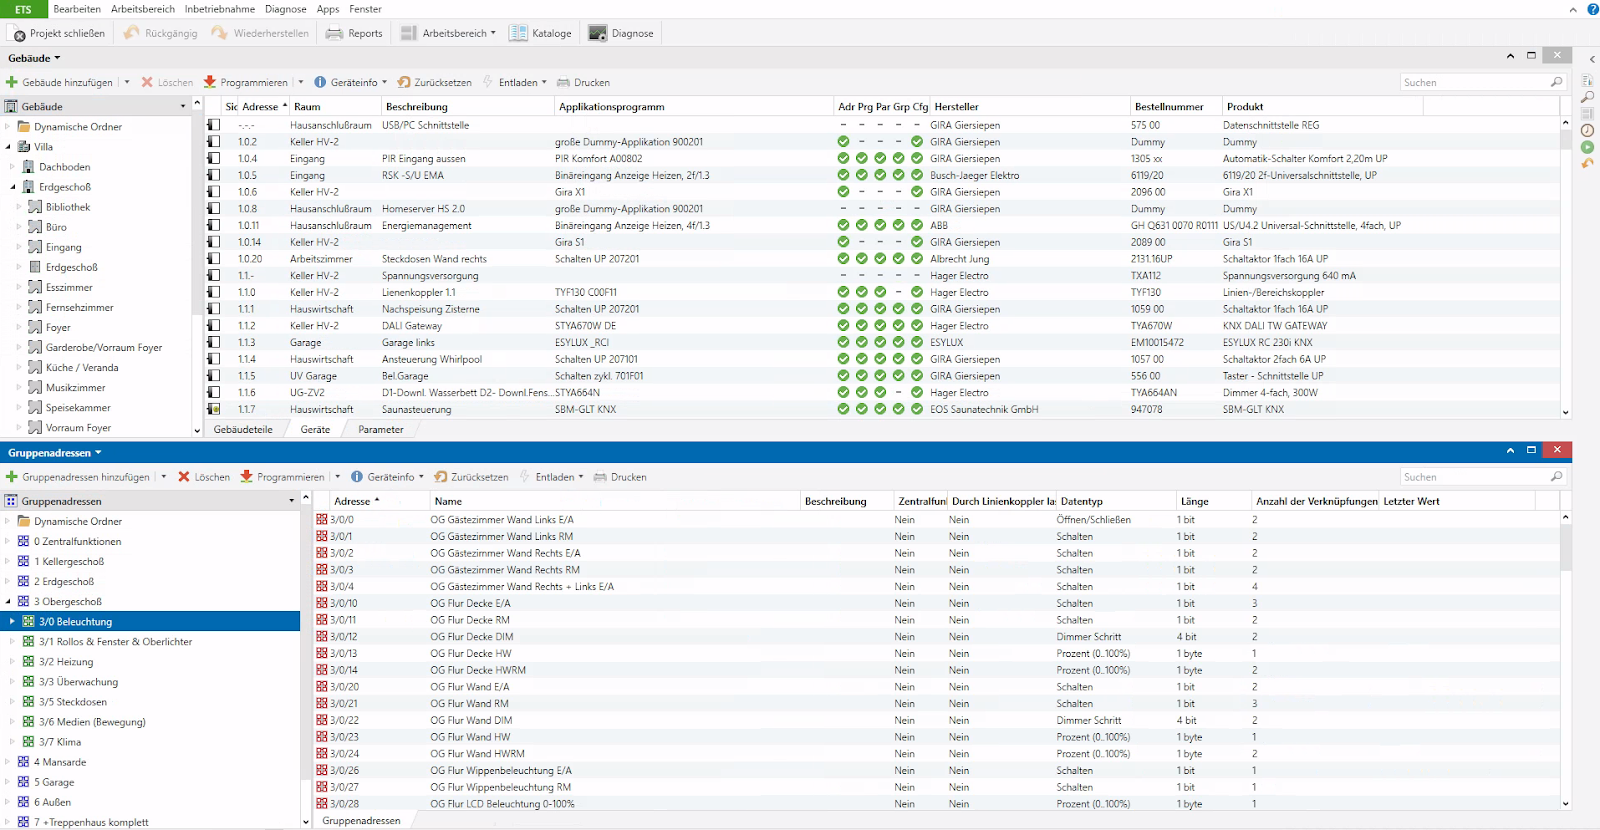
- Device catalog: In the device catalog window you can find device product data for most of the KNX devices (others you can download from the respective manufacturer page). The device product data defines how exactly you can use the device during your programming, more on that later.

2. Building structure: From the device catalog you simply drag and drop the device product data to a building structure which defines the structure of your building. This will help you navigate through all of your devices more easily.

3. Group addresses: Group addresses (GA’s) are the most important part to understand when learning about KNX programming. A group address is a definition for a command that devices can trigger or listen to and then based on the command’s value do a specific action.
In a simplified example we can program a push button on the wall near the kitchen door to send a group address named “Kitchen lights on/off” with a unique address 1/0/1 when the kitchen button is pressed. On the other side we program all light actuators that control lights in the kitchen to turn on or off all lights when they receive a group address named “KItchen lights on/off” with an address 1/0/1. That's it, this way all lights in the kitchen will turn on or off (toggle) once the button on the wall near the kitchen door is pressed.

4. Communication objects: When you click on a device in the building structure, you see a lot of different communication objects that the device can control. A button may have a communication object that controls the button press for different button areas, a dimming actuator may have a communication object to turn the light ON/OFF, dim it to a specific percentage or to query it to learn if it is currently turned on or off.
To connect communication object to a group address, we simply drag and drop the group address onto the communication object and the device will know that it is now using this group address with this communication object for communication with other devices.
5. Device parameters: KNX devices offer loads of different parameters to tweak and play around with. From different dimming curves to travel time of the shutters. You can configure device parameters under a parameters tab on the device details view.

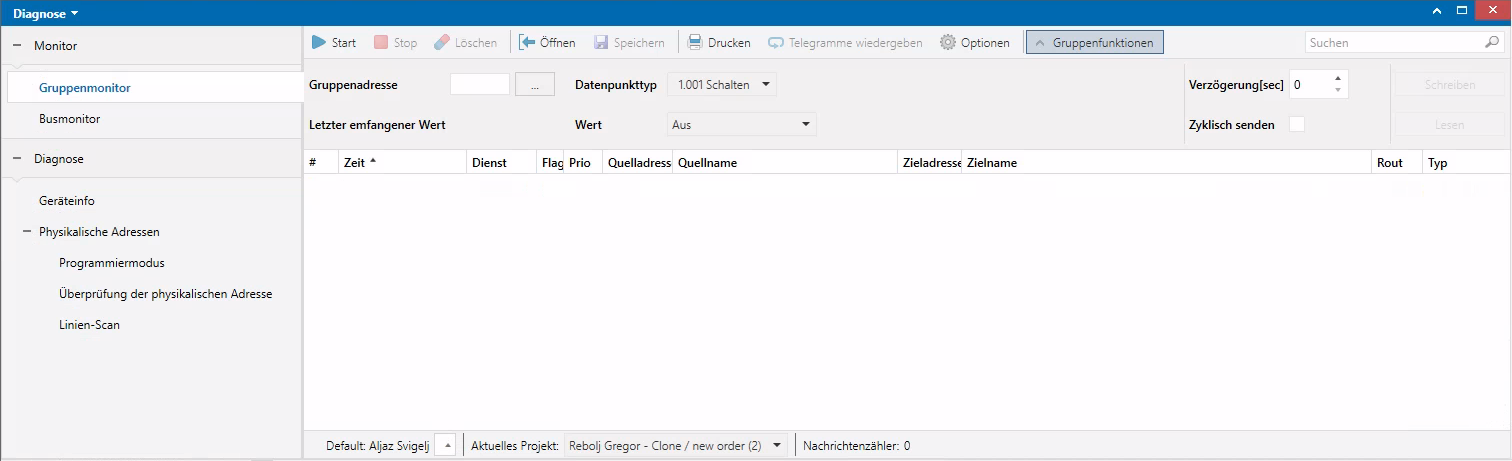
6. Uploading new configuration to devices and debugging problems: You can upload your newly created configuration to your device easily by clicking the download button (pressing a programming button on a physical device will be necessary the first time). You can also easily monitor your KNX bus and all the group address commands (telegrams) that are being sent around using a Diagnostics monitor. This will help you diagnose any problems much faster.
! IMPORTANT: After you finish configuring your KNX project, you can download the configuration of your installation in the form of an ETS project file. This file stores the complete configuration of your KNX project, serves as a backup and is also used by different smart home servers for easier setup. Make sure to keep it somewhere where you cannot lose it.
When you understand the above 6 concepts you are ready to start playing around with your installation. A good next step is to go through a virtual tutorial on how to program lighting, shading, heating and more (link to the KNX Virtual tutorials).
After you are happy with your KNX system configuration, you can move your KNX smart home to even the next stage and connect it with the world of thousands of IoT devices and use them together with KNX devices in your automations. Probably the easiest way to connect both worlds together is to use our 1Home Bridge device that is made specifically for that purpose. Go here to learn more about what you can achieve with it.
4: Prepare your ETS project file to visualise it with smart assistants
When it comes to KNX programming it’s important to keep in mind that the homeowner might want to visualise the home with a mobile app at some point, so all necessary group addresses need to be programmed in order to be fully controlled through the app.
Installations with KNX devices that don’t have feedback addresses programmed will work well with wall switches, but won’t be able to get the current device status to show it in the assistant mobile app. This is why certain group addresses are required in order to visualise your home with any mobile app.
1Home integrates smart assistants (Apple HomeKit, Amazon Alexa and Google Home) into KNX smart homes, for which you require:
- a 1Home Bridge or 1Home Box device,
- your ETS project file and
- a smartphone.
After creating an account in the 1Home Dashboard, you will be prompted to upload your programmed ETS 5 project file and with the help of our device recognising AI, your devices will be read and imported into the Devices tab. Sorted in their corresponding rooms, each device will be presented with its name, device type and properties (on/off, status, set percentage …).
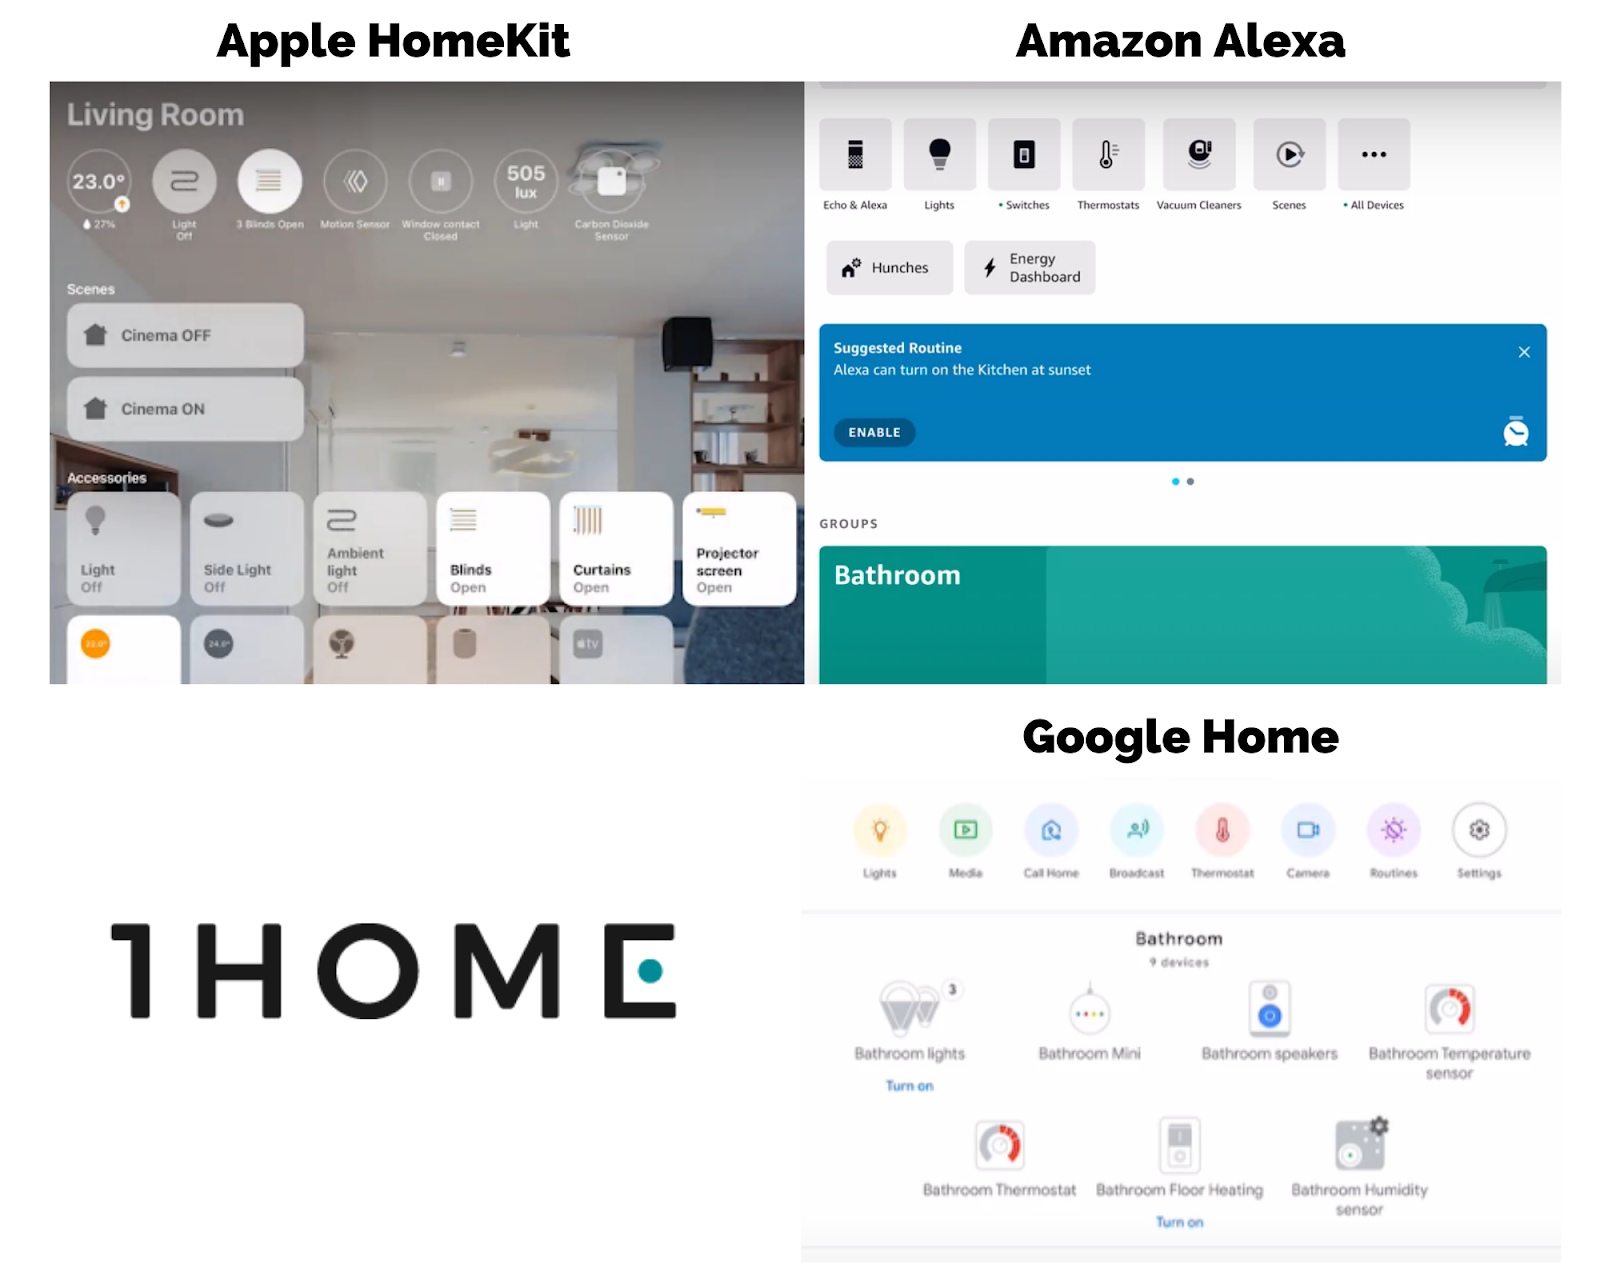
Then you will connect a smart assistant of your choice (Apple HomeKit, Amazon Alexa, Google Home) and import the devices into their mobile app.
Some of the addresses are obligatory (e.g. feedback address, transmit & read flags) for visualisation and if these essential addresses are left empty, the assistant mobile app won’t show the correct status of the device or may not show the device at all in the case of Apple HomeKit.
In this part we will present the necessary KNX programming configuration to ensure the home remains future-proof, even when integrating Apple HomeKit, Amazon Alexa or Google Home smart platforms.
The devices in Apple HomeKit, Amazon Alexa and Google Home are linked to KNX via group addresses and imported as one of the predefined device types (e.g. adjustable blind, switch, RGB light, …).
The device type can be changed easily at any time in the 1Home Dashboard, see how and it requires no knowledge of KNX programming if your installer has done his job already. The same goes for entering the missing group addresses. If they are pre-programmed, they are imported automatically at the ETS project file upload.
This is how the mobile app UI looks for each smart assistant platform once you import the devices:
Here are all popular KNX device types and the required addresses that a KNX programmer needs to include for great visualisation experience with smart assistants:
1. Switch
It is used for setting any device ON or OFF. Feel free to use it for anything that requires only the on/off switching and make it smart (e.g. dishwasher, coffee machine, ….). This is how it is shown in 1Home Dashboard:

Requirements:
- Switching on/off (1 bit, flags: C,W): sets device on or off.
- Switching on/off feedback (1 bit, flags: C,R,T): current status of the device to show in the mobile app or query via voice.
Additional settings:
- If you have two separate addresses for turning the switch on and off, toggle it to “Two addresses” and enter both addresses.
- If needed, change the device name, room or device type. This will be imported in the assistant mobile app.
2. Lights
Lights can be imported as Simple Lights (only on/off functions), Dimming Light (on/off, set % value), RGB lights (on/off, set % value, change color), HSV Lights (on/off, set % value, change hue and saturation) or Color Temperature Lights (on/off, set % value, change light temperature).
Here are settings for Dimming light as they are the most common type:

Requirements:
- Switching on/off (1 bit, flags: C,W): turns the light on or off.
- Switching on/off feedback (1 bit, flags: C,R,T): current status of the light to show in the mobile app or query via voice.
- Brightness value (1 byte, flags: C,W): sets the brightness to a specific percentage (eg. to 70%).
- Brightness value feedback (1 byte, flags: C,R,T): listens to the status of the current brightness percentage of the light.
3. Blinds
The blinds device type is used for any window coverings: blinds, shades, curtains, sun screens, etc. There are Simple (on&off) and Adjustable blinds (on/off, set % value)
Here is the setup of an Adjustable Blind that’s the most flexible of the two:
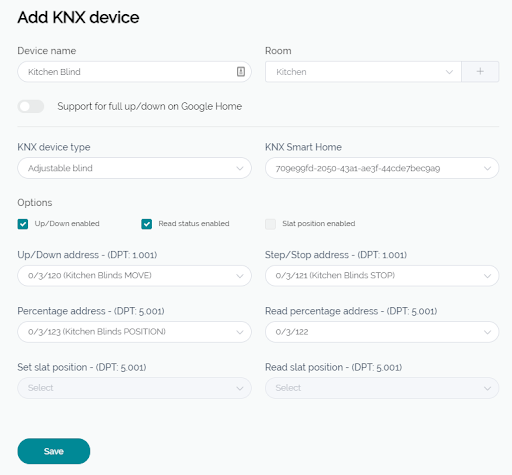
Requirements:
- Up/down (1 bit, flags: C,W): fully opens or fully closes the blinds.
- Step/stop (1 bit, flags: C,W): stops the blind from moving.
- Absolute position (1 byte, flags: C,W): sets the blind to a specific position measured in percentages to show in the mobile app.
- Current position status (1 byte, flags: C,R,T): listens to the status of the current position of the blind and displays it in the mobile app.
Additional settings:
- Absolute position of the slats (1 byte, flags: C,W): sets the slats to a specific position.
- Current position status of the slats (1 byte, flags: C,R,T): listens to the status of the current position of the slats.
4. Thermostat
The Thermostat device type reads the temperature in the room and controls heating devices based on the desired temperature and heating mode. This is done simply in the assistant mobile app.
This is how the thermostat is shown in 1Home Dashboard:

Required functions:
- Current temperature (2 bytes, flags: C,R,T): current temperature status to show in the mobile app or query via voice.
- Temperature setpoint (2 bytes, flags: C,W): sets the desired temperature.
- Temperature current setpoint (2 bytes, flags: C,R,T): tells what is the current desired temperature.
Additional settings:
- Heating/cooling setting (1 bit, flags: C,W): changes between heating and cooling mode (heating = 1, cooling = 0). If you need a 1 byte mode setting that supports auto, heating and cooling options, you can configure it in the 1Home Dashboard.
- Heating/cooling setting status (1 bit, flags: C,R,T): tells whether the current setting is set to heating or cooling.
- Additional functions that might be configured in the 1Home Dashboard are not automatically recognized. To see other options, go to my.1home.io -> Devices -> Green plus button (top-right corner) -> Add KNX device -> select KNX device type Thermostat.
5. Air Conditioning
The Air Conditioning device type supports: controlling the temperature, fans, swing modes and heating/cooling modes. Please keep in mind that only Apple HomeKit supports this device type. This is how it is shown in 1Home Dashboard:
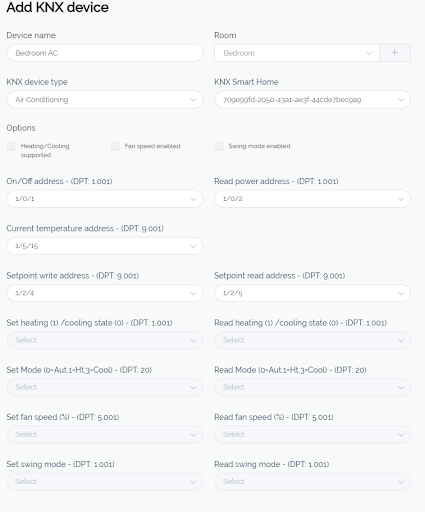
Required functions:
- Switch on/off (1 bit, flags: C,W): turns the AC on or off.
- Switch on/off status (1 bit, flags: C,R,T): current status of the AC to show in the mobile app or query via voice.
- Current temperature (2 bytes, flags: C,R,T): current temperature to display it in the mobile app or query via voice.
- Temperature setpoint (2 bytes, flags: C,W): sets the desired temperature.
- Temperature current setpoint (2 bytes, flags: C,R,T): tells what is the current desired temperature.
Additional settings:
- Heating/cooling setting (1 bit, flags: C,W): changes between heating and cooling mode (heating = 1, cooling = 0). If you need a 1 byte mode setting that supports auto, heating and cooling options, you can configure it in the 1Home Dashboard.
- Heating/cooling setting status (1 bit, flags: C,R,T): sends information on whether the current setting is set to heating or cooling.
- Additional functions such as "fan speed", "swing mode" and more complex changing between heating, cooling and automatic modes can be configured in the 1Home Dashboard, but are not automatically detected. To see what the other options are, head to my.1home.io -> Devices -> Green plus button (top-right corner) -> Add KNX device -> select KNX device type Air Conditioning.
6. Fan
Fan device type can be turned on/off and you can also set the speed of a fan (in %). Additionally you can add addresses for swing mode if your fan supports it.

Required functions:
- Switch on/off (1 bit, flags: C,W): turns the fan on/off.
- Switch on/off status (1 bit, flags: C,R,T): listens to the status of the Fan to show in the mobile app.
- Fan speed (1 byte, flags: C,W): sets the fan to desired speed (in %).
- Fan speed feedback (1 byte, flags: C,R,T): listens to the status of the Fan speed to show in the mobile app (in %).
Additional settings:
- Swing mode (1 bit, flags: C,W): sets the swing mode on/off.
- Swing mode feedback (1 bit, flags: C,R,T): listens to the status of the swing mode to show in the mobile app.
Note: Fans can’t be imported into Google Home and Alexa.
7. Garage Door
Garage Door device type is used for different types of garage doors, we support the opening via a pulse or toggle switch.
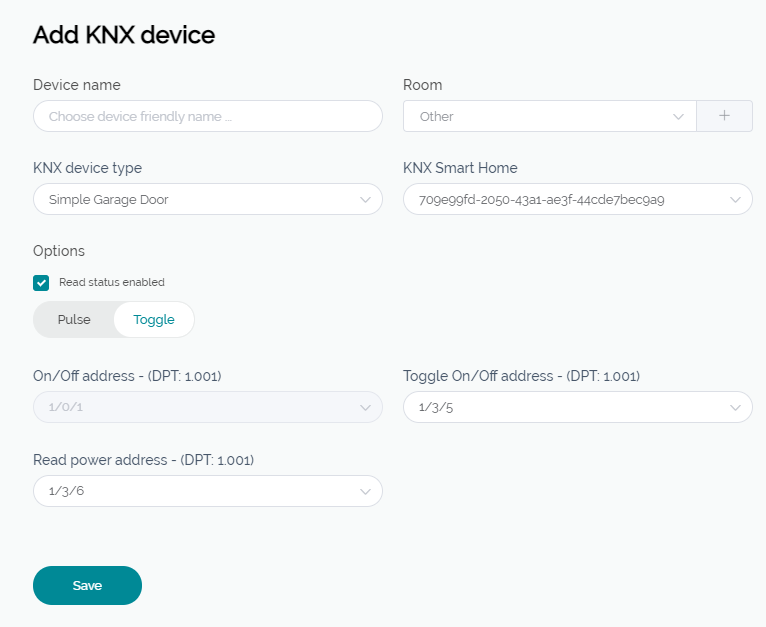
Required functions:
Pulse enabled
- Switching on/off (1 bit, flags: C,W): opens or closes garage doors by sending an ON signal and then after a few seconds an OFF signal.
OR
Toggle enabled
- Toggle on/off (1 bit, flags: C,W): opens or closes garage doors by sending either ON or OFF signal.
- Switching on/off feedback (1 bit, flags: C,R,T): reads current status of the garage door to show in the mobile app or query via voice.
8. Push button
Push button objects bring the control of your physical KNX wall switches to HomeKit and use them to also control HomeKit devices,

Required functions:
- Short press address (1 bit, C,T): address that you want to trigger with a short press.
Additional settings:
- Long press address (1 bit, C,T): address that you want to trigger with a long press.
- Double press address (1 bit C,T): address that you want to trigger with a double press.
9. Speaker
The Speaker device type is used for controlling speakers of all sorts (please keep in mind that only Alexa and Google support them), here’s how it is shown in 1Home Dashboard:

Required functions:
- Set mute (1 bit, flags: C,W): mutes/unmutes the speaker.
- Mute feedback (1 bit, flags: C,R,T): tells if the speaker is muted or not.
- Set volume (1 bytes, C,W, DPT: 5001): sets the volume to a specific value.
- Volume feedback (1 bytes, C,R,T DPT: 5.001): sends information on the current volume value.
If your ETS project file is missing any of the required functions, then the device won’t work reliably with the voice commands, the app won’t be able to show the status or, in the worst case, the device won’t be shown at all in the assistant’s mobile app.
If you’d like to find out what the common issues with KNX programming are when it comes to visualisation with smart assistants, head HERE. If you’re experiencing issues with your imported devices or you assume the KNX programming wasn’t done correctly, our support team is happy to guide you at the lower right corner of the 1home.io webpage.
A number of devices aren’t supported by the assistants, no matter the amount of KNX programming or what the KNX actuators themselves support. To see what KNX and Loxone devices Apple, Alexa and Google support, check out this these lists:
To use voice control with all of your KNX devices it’s important to be familiar with the exact commands that were programmed for your assistant. These commands are constantly being added as each assistant adds new ones or improves their language-processing. We have tested and collected the working commands for you.
To get a list of tested voice commands for each device type and voice assistant, see:
- Apple Siri English voice commands
- Apple Siri German voice commands
- Apple Siri French voice commands
- Amazon Alexa English voice commands
- Amazon Alexa German voice commands
- Amazon Alexa French voice commands
- Amazon Alexa Italian voice commands
- Amazon Alexa Spanish voice commands
- Google Assistant English voice commands
- Google Assistant German voice commands
I hope this article has given you the confidence needed to dive into KNX programming yourself or more insight into the world of KNX integrations.
In case you have any questions, feel free to kick off a conversation with our support team at the lower-right corner of the 1home.io webpage.